The Vault Sale and $50 Giveaway

The giveaway has ended and winner will be announced shortly! Thanks to everyone for your participation!

Enter to win some beads!
During the giveaway I am also having a 20% off storewide sale, so that $50 is worth so much more. The winner will be able to use their credit toward a purchase made during the contest. If you found this drawing thru my newsletter, great!

This sale and giveaway helps me clear out space for the new gemshow beads that will show up near the end of the month. Let me know if you have any special requests!
  • Subscribe to the newsletter and click the giveaway button therein, subscribe>(one entry)
  • Comment below WITH a link to one of your favorite listings (one entry, make sure I can contact you, don't leave an anonymous comment)
  • Write about/link the contest in your blog leave the link in a comment below (one entry)
  • Write about/link the sale in your blog leave the link in a comment below (one entry)
Follow the entry rules closely, they allow me to track your entries. Each entry will be assigned a number which will be chosen using random.org to determine the winner. Contest runs from now to December 3rd. The winner will be notified using one of their entry methods and receive a $50 credit to LiciaBeads Vault which can be used for purchases from Nov 2nd 2010 onward.
_________________________________________________
Employees and direct relatives of LiciaBeads are not eligible to enter. Entries are for LiciaBeads Vault only and do not apply to jewelry. Winner must (have) select(ed) their items from those in stock and "checkout" using an Etsy account. Invalid entries, anonymous or untraceable comments, or obvious spam will be deleted from the comments.

Wedding necklace in progress

It's not easy to do the crazy wire wrapping and avoid destroying my nails in the process. Here is what I have so far. Each piece is formed using a jig and then finish formed by hand, then hammered and wrapped onto it's section of leaves. Then they area all linked together (so hard to get everyone to hang just so!)


After they are linked I am adding itty bitty off white freshwater pearls between the sections. It hangs about halfway down the back.

I still am not sure if I want the long back to have a gemstone dangle at the end... opinions? Maybe the pearls should "fizzle out" in a chain... maybe both pearls and a gemstone. In any case, I feel like it needs to come more to a point at the back.


Here is the front, still needs the pearls though. I'm wrapping throughout the day.

And I still need to decide a design for earrings and a bracelet! Oooh, should I do an anklet? I could do a simple one for everyday too since noone will see it at the wedding...

Comments, suggestions, opinions!! :)

Concrete counterops and bead gutters

It's in progress! So we took the forms off the left counter top and have plenty of finish work to do (because I know there is someone going "eew, is that done?) since it's not done yet. The forms are still on the right hand one while it continues to set. We did things a little differently with the second one and will see how that worked out.

And because my little round beads like to roll all over the place, I incorporated a bead gutter into the sides of my counter. Everything needs to still be sanded smooth, so all the rough edges and ridges and such will be much more finished looking. No worries!

Another shot of my little gutter :)

Messy mud pie in my table

So, this was fun and exciting :) We just did this a little while ago and are waiting for the concrete to cure a little bit and the water to evaporate. Then we are going to smooth it out and stick stuff in it that we got in downtown Edmonds at a place that sells rocks and other cool earthy things.
(See the whole thing from current to beginning, click here.)

Pool table

(See the whole thing from current to beginning, click here.)

More progress in the ongoing office renovation. Forms have been built around the base tables to be filled with a cement sand mix. They are even textured so that the final product will have a nice pattern on the side of the countertops. The counter top as you see it below has also been covered in a foam material to keep them from being too heavy.


So the top level counters are just about ready to accept concrete (tinted dark). The mesh form below will be set into the table above as it is filled with the cement mix. It will be filled in a bit at a time and the top will be smooth finished. After they are completed, we will do the desk height counters.

Cool huh? It's like we know what we are doing... okay, so this is the first time we have done such a thing on the interior. It's exciting anyway!

Creating my own wedding jewelry

Sneak peak peeps!

So now that I know what the dress is going to look like I can finally start working on my necklace. My favorite part is that it has a low back, so I am going to take advantage of that part. I always feel like the back of a necklace should be just as fantastic as the front.
Here are my preliminary drawings that I started with. I'm working on bending wire and will get some photos of that part soon too. I have to decide on what stones I will use as well... I'm not sure yet but I may just use little tiny cream pearls.

Open to ideas too, leave them in a comment ;)

Preliminary built ins

My new side of the room! Well, it doesn't look like much now, but you have to be patient. Each side of the room has a standing height counter top and a desk height counter top. The forms you see here will be topped with a concrete surface. I have to decide if I want to embed anything into them.

The big table will be a creative surface for other projects (likely card making and things of that sort) and the giant crazy heavy drafting table will be on the "man side" of the room. The secret of this room is that the counter with the yellow level will hold the kitty potty room, enclosed (except for a little kitty door) around the exhaust fan for when Rockaboy drops bombs. Didn't want to know that part? Oops!
It's coming along :)

What the office is, and what it will become

So for the last 4 years I have been working from this desk. It's a nice desk, certainly nothing to be upset about, but it just isn't cutting the mustard anymore. I've grown out of it. It would be a great desk for doing general writing but isn't suitable for computers and such.

I didn't clean up first... cause lets be honest, this is how it usually looks. Little pieces of furniture and bins have been added as I "grew" but I don't know that I can add any more.

Behind me is the Shipping Office. This is where I play with the bubble wrap and paper cutter and all the little envelopes and ribbon. See the little wooden table (which is actually a stool on top of a tall plastic storage bin), that's my work surface. It's for one thing at a time only, which is okay since that is how I do things... but it's a little lacking.

So that is my current little space... and following is the new office in construction. We combined two bedrooms to make what will be the new office. Doing this makes it nice and light too, which really helps!

The side below will be my side (I get a whole side peeps!). The plan is to make a big counter top, suited at varying heights for specific work spaces. There will also be a big table in there as a center "island" for teaching, classes and crafty parties. (Crafty parties peeps!!!)

This will be the "boy" side of the room below. Eventually there will be outside access to the covered patio (see the construction of the pergola patio we built) . It's gonna be so much nicer!
This is the far side of the room. Nothing special.. yet.
So that's where we are so far. We are thinking about flooring options too. I am thinking large 4' square A side of ACX plywood as the floor surface with countersunk bolts in the corners, epoxy covered. Medium honey stained and sealed. James want's to do dark gray concrete countertops, which I think would look great with the floors for a cool industrial feel. I have requested a little bead gutter set into the countertops so they don't roll off the counter.

He textured the walls to match the two rooms with the rest of the house where they didn't already. I'm thinking about colors... soft sage green (Prasiolite :), or maybe a dusky gray blue, but I am leaning toward a soft yellow/orange clay color. I'll have to think about it and consult with the other parties.

Stash up shots

I got some beads. The following are among the loverlies that I brought home to sort, and pair and take pretty pictures of for your purchasing and creating pleasure. The stash doesn't fit in the lightbox very well so these are not the best photos, but trust me, they sparkle!
Lots of requests for mystic quartz in all shapes and sizes, bring just that. Cubes, onions, hearts, pears, coins, cushions, and squares (and barrels and step faceted twists and rondelles).

Chalcedony, a favorite among many for their colors. I try and try to find the deep saturated ones but it's not easy. I got some hot pinks though!
Rutilated quartz, Tourmalinated quartz, peridot (in small and itty bitty), garnets, labradorite and topaz.

That's just a taste. I have lots of work ahead of me to sort the stash and get organized enough to sell. If you see something you "must have now", let me know and I will start the strand. I'll be doing more full strands for sale as well if you see something you need/want.

A loverly weekend to you all!

Congratulations to the winner!

The winner of the $50 credit to my gemstone and jewelry supply store is Kathy with the Etsy store KatDesignsNYC and Moonstruckmagic Bath & Body

CONGRATULATIONS KATHY!


Thanks to everyone for participating and guiding me toward a more sparkling shop. Welcome to all the new followers on Facebook, Twitter and the Newsletter! This was fun, keep your ears on for the next event (November).

Did you miss the fun? Don't miss the fun!
SUBSCRIBE to the Vault Newsletter
FOLLOW the tweets
FACEBOOK for even more exciting news

Enter to win a $50 gift certificate to my jewelry supply store!


This Drawing has ended, thanks to all the participants! Stay tuned!


This giveaway is going on at the same time
as my 20% off sale at
LiciaBeads Vault on Etsy.


The winner will receive a $50 credit to my Gemstone and Jewelry supply shop. Each entry will correspond to a number and the number will be selected using Random.org

The drawing ends on June 24th (midnight Eastern), just before the gem show so the winner can also take advantage of the new stock and sale.

There are many ways to put your hat in the ring and get an entry!
  • Leave a comment below with a link to your favorite listing from my Vault shop
  • Subscribe to the Vault Newsletter which will give you an entry link (and a little something else ;)
  • Twitter - follow me on twitter and tell me you want to enter using @liciabeads #enterme for the $50 gem and jewelry supply giveaway
  • Twitter - (up to one entry per day) tweet about the sale using @liciabeads #GemVault20% http://www.etsy.com/shop/liciabeadsvault
  • Twitter - (up to one entry per day) tweet about the giveaway using @liciabeads #GemGiveaway$50 http://tinyurl.com/25e4wyq
  • Facebook - "Like" me on Facebook and leave me a note on my wall that you want to enter
  • Blog - Blog about the sale or giveaway and leave your blog link in a comment below
  • Refer a friend for two entries! Have your friend/s post a comment below with your name and you get 2 entries! They get an entry for their comment as well.
So there are lots of ways to enter and lots of ways to keep entering (up to two times daily using the twitter methods). BE SURE that there is a way for me to contact you if you leave your comment to this blog posting. Facebook, Twitter and newsletter subscriptions all allow contact links of some sort but anonymous comments will not work for obvious reasons, so be sure there is a way to contact you (leave your Etsy shop name, or twitter address if you don't want to expose an e-mail).

Thanks to everyone for their support and comments! Feel free to let me know if you have any questions or special requests at Vault (at) LiciaBeads (dot) com

Have a delightful Summer!


$50 Giveaway, Summer Sale, and gem show restock!

For those who are interested in all things beady, there are some wonderful things about to happen in my Jewelry and Gemstone Supply shop on Etsy. All the great details will be available in my Vault Newsletter!

I encourage you to subscribe for the best benefits, and you could win $50 worth of free beads!

Sterling Wire wrapping project (#3)

The main portion of the necklace is coming along. I have decided to include some Spessartite Garnets that I have been hoarding. They are a delicious sparkling bright orange. I'm still not quite sure what to put with them...

I put the beads on a separate wire than the wrapping one because I want them all to face with the faceting forward rather than wrap them directly in with the work. If you have wrapped before, or looked around at work, this will probably make more sense to you. There are so many ways to do things that sometimes it gets complicated. :)
This is where I am so far... and I can feel myself getting stuck. It's natural that along the way the inspiration slows because I don't want to "try something" and mess it up. There is a little more wrapping to be done to get it stable to the point that it can handle being worn and the additional stones that will go onto it. I have to figure out what kind of chain to make too. I want it to look rather substantial and have enough visual weight to balance out the central pendant.

Have a lovey weekend all, I'll get back to it!

Breaking down walls - office construction


This is the big hole in the ceiling (one of them) that a smart kitty could get into if she tried. So, the door is to remain closed while the non kitty portions of the house are accessible.

There he is with the saw that makes lots of noise. Our wall is almost gone! Yay! It's much brighter in there too, which should be great for photos :)

Sterling Wire wrapping project (#2)

The progress is coming along with the wire wrapping. One of the things I notice with my work is that the wire wrapped portion tends to look more like a pendant. I'm working on trying to incorporate it into the necklace so that everything fits together onto the necklace itself.

I've done some additional sketches that include a full scale "traced" original. You can see my progress on the actual work in the photo also. I tend to change things and work it out as I go along, for me it's a fluid process.

I've chosen a preliminary selection of Peridot, Phrenite, and Spessartite Garnet for the gemstones, but might change that up too. :)

Sterling Wire wrapping project

My favorite pieces of jewelry always tend to be the wire wrapped bits. I like the intricate details that can be created with very fine wire. I recently did a few little spirals for earrings but the ones that draw the most attention tend to be the unique shapes and intricate weaves with gemstones.

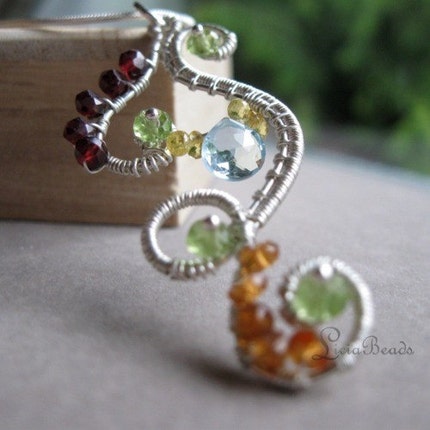
This one to the right is among my most viewed. It sports :) a collection of colorful faceted gemstones and is hand wrapped in sterling silver wire on a sterling base.

I wanted to do another free form shape so the first step is getting out the sketch pad (handmade by nightowlcraftworks) and drawing some shapes. I'm a fan of filigree and wrought iron and like to get some intricate patterning involved in the wrapping so I basically have to draw it out first. Sterling is expensive, and I attempt not to waste it on mistakes.

The initial drawing looks like this. With some modifications, I decided to go with the one on the left. I sometimes make changes while I am in progress depending on fluidity of shapes, how the wire fits together, and inspiration.

After some forming, and hammering for structure, I put the pieces side by side to make sure they will fit the way I want.
Then I think about adding components like chain and gemstones. It all comes together slowly as each component is added. I find it important to make sure things fit the way I want. Sometimes that means testing it out with copper wire too since I may not want to mess with the actual piece or potentially waste precious wire.

So this is where I am. Stay tuned for the choosing of gemstones, and components.

Take a look at these studs

Awesome! It's clean and ready for more destruction. The kitties have their little spot back... with some small differences. I'm sure they are confused and delighted now that they can walk thru walls.

Wheres the mess? Out the window, that was easy!


Caught with your walls down

Of course it's a mess! I cannot wait till it is finished :)

Sometimes fake wood paneling is the better option...

It depends on the circumstances which is best. In this case, the paneling is better.

Thankfully, it doesn't matter either way, because the entire wall is coming down.


Soon two rooms will be one and there will be an actual space for both of us to work in relative "clarity" :)

Elevator!

Maybe this is my own personal story, maybe not. Did you ever play elevator as kids? This usually happens in a hallway with several closely spaced doors.

What happens is, everyone gets into the "elevator" and closes all the doors. Then when the elevator gets to the right stop, someone gets out on one of the floors (out one of the doors). Anyway, it was quite a bit of fun when we were kids. Expecially since the old fashioned hanging chime doorbells were in the elevator and we liked to make noise with them as we reached each floor.

So now we almost have an elevator with three closely spaced doors. Okay, not really since the other two doors have been removed, but you know what I mean.

Oh, by the way, the new door is in :)

Who needs privacy

Later that same day:
Two doors are removed, one is being prepped for installation. The cats gave up interest as it started getting a tad loud.

If they want to get to their potty shack they will have to pass the land of demolition.

Initially we were hoping for lots of secret cash compartments behind the door frames..... but there were none.

Destruction of a hallway

We are not scared of taking things apart for the greater good. That greater good is a real office rather than our two businesses crammed into a little bedroom.

In order to operate to my full potential, I need lots of space designated for the various daily steps that my work requires. It would be great to have a spot for : photography, packing and shipping, internet, design and "construction" of work and not have to clean up each thing as I need to start the next.

And his business requires this HUGE fancy drawing table that fills up most of our little bedroom office. The cats cannot even enjoy the desk as it is off limits to those with fur.

Meanwhile, I hear the preliminary small destruction sounds like tapping for studs (awesome gay band name), and pencils on the wall and tape measures.. I'm sure they will soon become the bigger sounds that I am used to, things that require electricity.

Rocky (our silly cat, aka. dumb boy ) is staying out of the way but keeping an eye on things. Maggie is on the bed happy to be rid of Rocky to enjoy her beauty sleep.

A real office! I'm so excited :)

Landscape before and afters, client installation update

We build gardens. Call us and get your dream garden to stay outside in.

Garden installation by Ginkgo Landscape Design, serving Seattle northward to Edmonds and select Eastside locations.

As we go along in a landscape it comes along slowly but eventually prompts a lot of reaction from the homeowners as well as neighbors who are familiar with the before and after as they pass it regularly. I always like to make a comment regarding the progress... today's was: "Remember when this was a driveway?" Cause... before we got our hands on it, it was. See what we did to the driveway here.

We do all this the hard way, by hand with shovels, wheelbarrows and a little muscle and lots of construction and overall garden knowledge. It takes a while from start to finish (and there is more to come on the front yard) because it's just the two of us from initial design consultation all the way thru ongoing care and maintenance of a completed design.

Following are a few before and afters. (Befores were taken in Summer, afters in early Spring, leaves soon.)
______________________________________________________
^Before: The clients had that typical crammed in feeling at the back door and no place to set groceries, store trash cans or just enjoy their welcome home...

After: The new deck gives them a large landing to the back door and creates a huge back living space. It's placed to get morning sun, and have portions of sun and shade throughout the rest of the day. Added bonuses include the seat height railings and trellis above wired for pendant lighting. There is also deck lighting at shin height that comes on at dusk, off at dawn or adjustable to the clients wishes.
______________________________________________________
^Before: That bushy looking thing obscuring the garage is a very old pear tree. It takes a while to get a fruit tree back to the point where it produces well, but this one well on it's way and even produced quite a few pears last season.

After: It's such a bonus to be able to get around from garage to house to garden barefoot if you want to. The new paver hardscape in this garden offers exactly that as well as a great entertaining space or just lounging in your outside.

______________________________________________________
^Before: It's a little hard to see, but the fence that is crowding the house in the above photo was entirely removed and pushed back about 15 feet to reclaim the useable space from an unused circular asphault driveway. I'm all for reclaiming space for plants.

After: The new fence incorporates a trellis for the homeowners climbers as well as a defined entry, and a space for the recycle and trash cans to hide them from view. They are on the far left in their own little cubby next to the garage, invisible from all sides but overhead. Having easily accessible yet hidden space for the trashcans is often overlooked, it shouldn't be.
______________________________________________________
^Before: Grass... mow weekly, accept weeds or spend your precious time weeding.

After: No grass, no need to mow. How about planting veggies and herbs in the raised hand stucco'd planters instead. Ultimately there will be a door into the garage to contain an indoor potting area. Since this is a large garden with lots of deciduous trees we built several compost bins. You can see one at the back fence-line with a red wheelbarrow leaning on it.
______________________________________________________
Following are some more afters:
A view of the raised planters, elegantly curved to reflect both circular patios. Note: this is not easy, but very worth it! Everything is prepped with irrigation because it's just not possible to water this entire garden daily by hand. It's electronic and takes care of everything for you, it has a rain sensor and will not waste your water if it has rained recently. This garden has several zones since the veggie planters need different care than the landscape plants.


This is the new view that never existed before. From the back window of the house one can overlook the entire back garden. Look closely and you can see the little deck lights on either side of the entrance.

That's it for a little while in this garden, but it finally looks like the drawings. Stay tuned for the following phases though because it's not over yet!